Relay control in Arduino
Our small microcontrollers operate at very low currents and voltages; for this reason, they are unable to control electronic devices that run on high currents and voltages, such as a light bulb that uses 220 volts. However, as everything in this life has a solution (or almost everything), we can use a device called a relay to overcome this problem.
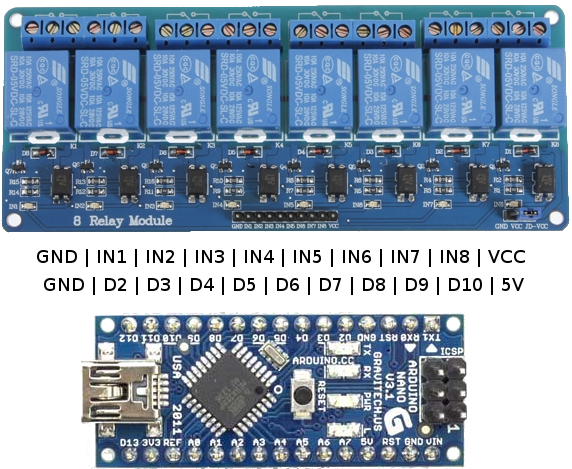
In the following image, we can see the connections made between the relay and the Arduino:

Once the connections are properly made...

We will need to write the code. In this case, we will program with the Arduino IDE. The program will declare pins 2 to 10 as output (OUTPUT) and will have a function responsible for turning the LEDs on and off for a duration defined in the main function.
In the loop, we will call the function vEnchegaApaga 8 times (one for each PIN); by default, we have left a one-second wait time between pins.
Here you can see the code, or download it from this link.
``
void setup(){
 pinMode(2, OUTPUT);
 pinMode(3, OUTPUT);
 pinMode(4, OUTPUT);
 pinMode(5, OUTPUT);
 pinMode(6, OUTPUT);
 pinMode(7, OUTPUT);
 pinMode(8, OUTPUT);
 pinMode(9, OUTPUT);
 pinMode(10, OUTPUT);
}

void vEnchegaApaga(int pin,int time){
    digitalWrite(pin,HIGH);
 delay(time);
 digitalWrite(pin,LOW);
}


void loop(){
 int time=1000;
 vEnchegaApaga(2,time);
 vEnchegaApaga(3,time);
 vEnchegaApaga(4,time);
 vEnchegaApaga(5,time);
 vEnchegaApaga(6,time);
 vEnchegaApaga(7,time);
 vEnchegaApaga(8,time);
 vEnchegaApaga(9,time);
}
Here we can see a video showing the relay in action.